Configuration Postman Tool with Salesforce
Postman Tool Setup and Configuration
Ø HOW TO INSTALL POSTMAN TOOL ON GOOGLE CHROME
Ø MANAGE ENVIRONMENT SETUP
Ø IMPORTING COLLECTION INTO POSTMAN
Ø CONFIGURATION OF FIRST TAB TO GET SESSION ID
Ø CONFIGURATION OF SECOND TAB TO GET WEB SERVICE API RESPONSE
Ø FEW USEFUL LINKS
Ø MANAGE ENVIRONMENT SETUP
Ø IMPORTING COLLECTION INTO POSTMAN
Ø CONFIGURATION OF FIRST TAB TO GET SESSION ID
Ø CONFIGURATION OF SECOND TAB TO GET WEB SERVICE API RESPONSE
Ø FEW USEFUL LINKS
How to install Postman Tool on Google Chrome:
Step
1: Install Google Chrome
If you haven’t done so yet, please
install Google Chrome
Step 2: Install
the Postman extension for Chrome
Open Google Chrome and install the
Chrome Postman extension.
Step
3: Install the Postman Interceptor extension for Chrome
Install the Postman Interceptor
extension.
Step
4: Configure Postman
Click on Apps

Ø Click on the Postman icon
Ø You will get access to all the
Google Chrome installed extension.
Ø Click on Postman

ENVIRONMENT SETUP:
1. Click the Setting icon “Environment
Options”

2. Click the "Manage
Environments"
3. By clicking, Manage Environment
popup window will displayed
4. Click "Add" button under
Manage Environment tab

5.
Give
the name / Add environment name in the text box field
e.g. DemoAPI
6. Click the cursor at down side of the
'key' column and enter the values in the 'value' column
7. username à (login application name of sales
force)
e.g. ashish.bhind@barclayscorp.com.procfeecit
8. password à (login application name of sales
force) password
10. token à create a token from the application
12. Click "Add" button and
Complete the setup
13. Close the popup window

IMPORTING THE COLLECTION INTO POSTMAN:
1.Click the "Import" option
from the top menu

2.Click the "import from
link" tab
4. Click the “Import” button

5.Once you’ve imported it, you should have a new
collection called “Salesforce” with a POST request called “Login.” Click
on it and it will load up the request on the left menu.
2 6. Click on "Post Login"
option
a
a 
Now on the right side Tab 1 à“Login” as a tab name will display.
Also below mentioned Base URL will
display:
URL à {{baseurl}}/services/Soap/u/40.0
Note - This base URL is as we setup
the Manage Environment.

Environment Selection à
Select the already created environment
name option.

Environment quick look
Option à
Click the “EYE” icon option on the
right side of the top menu bar. You will see the entire already created setup
environment.

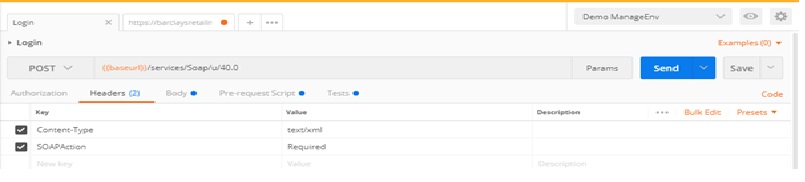
Configuration of First Tab to get Session ID :
1.
POST
à
Select 'POST ' from ddl.
Note - Already selected
2.
POST
URL à
{{baseurl}}/services/Soap/u/40.0
Will display
automatically once click the SEND button.
3.
Authorization
à
I.
Click the
Authorization option
II.
Authorization Type --> No Auth
4.
Headers
à
First Time when login
then Content -Type should be always:
I.
Content-Type
à
"text/xml"
II.
SOAPAction
à “Required”
Then click the Send button to create
the Session Id in the "Header >>
Body" section
5.
Body
à
Will display
automatically -
=========================================================
<se:Envelope
xmlns:se="http://schemas.xmlsoap.org/soap/envelope/">
<se:Header/>
<se:Body>
<login
xmlns="urn:partner.soap.sforce.com">
<username>{{username}}</username>
<password>{{password}}{{token}}</password>
</login>
</se:Body>
</se:Envelope>
=========================================================

6.
SEND
option à
1.
Click the “SEND”
option.
Once
hit the SEND option, in the Body section you can find the session id.
Copy that <sessionId>
Copy
below Session Id is in red mark:

Paste this
Session Id as mentioned below section:

Configuration of Second Tab to Call WEB Service:
1.
Post
à
Select
the POST option from the drop down
2.
URL
à
a.
Enter the URL - https://barclaysretailmortgages--procfeecit.cs85.my.salesforce.com/services/apexrest/GetBrokerDetails OR
c. Application URL à
This URL should be the application
URL from
d. API Details à
services/apexrest/GetBrokerDetails à This append URL should be which we want to
receive the details.
3.
Authorization
à
I.
Click
the Authorization option
II.
Authorization Type --> No Auth
4.
Headers
à
e. Click the Headers option - Enters
the details as per Key and Value columns
f.
Key
value column : Enter "Authorization"
g. Value column :
"OAuth"<space>paste the <sessionId>
e.g. OAuth
00D0E00000019Vv!ARAAQO41GwitpBSpag7FXIKzUY74GCEnYnzm_VX7Rq64MnpCjEFEnpIucPxwHdvwUBzfVBCxaJ2IGVolM7BTKhNm8ZhvoO9Z
h. Key value column : "Content-Type"
i.
Value
column : "application/json"
5.
Body
à
I.
Click
the Body option
II.
Select
the "raw" and enter the below
mentioned API request:
=========================================================
{
"brokerDetails": {
"brokerInformation": {
"introducerReference": "BA0053070"
}
}
}
=========================================================
Please
note - Request may vary
|||.
Select
the option JSON(application/json) from the drop down next to "raw"
6.
Send
à
Click the “Send” button
Before
Clicking the Send option – API Request is written in the body section

After
clicking the Send option – Response will display


Very good great article
ReplyDeleteThanks man
DeleteVery useful article from installing to configuration of Postman tool.
ReplyDeleteStep wise installation process. Good one for any new beginners who want to use this Postman tool for API Testing.